Spring 入门(一) Spring概述
本文是spring 入门教程(一),目标是知道Spring是什么,能做什么,以及一个简单的Spring的例子,内容基本均拷贝自以下参考资料。
参考资料:
- Spring 参考手册(官方)
- 张开涛的跟我学Spring3
- 《Spring源码深度解析》 郝佳
- 《Spring5开发大全》 柳伟卫
- 《Spring5高级编程》
- Spring源码解析 – AnnotationConfigApplicationContext容器创建过程
- spring 源码解析 AnnotationConfigApplicationContext方式启动容器
- BeanDefinition到实例Bean的源码分析
Spring介绍
Spring 是于2003年兴起的一个轻量级Java开源框架,由Rod Johnson 在其著作 Expert One-on-One Java EE Design and Development 中阐述的部分理念和原型衍生而来。Spring 目的是用于简化企业级应用程序开发,它使用基本的 JavaBean 来完成以前只可能由 EJB 完成的事情。然而, Spring 的用途不仅限于服务器端的开发,从简单性、可测试性和松耦合的角度而言,任何 Java 应用都可以从 Spring 中受益。
Spring以IoC (Inverse Of Control:控制反转/反转控制)和 AOP(Aspact Oriented Programming:面向切面编程)为核心,提供了表现层SpringMVC和持久层SpringJDBC以及业务层事务管理等众多模块的企业级应用技术,还能整合开源世界中众多著名的第三方框架和类库,逐渐成为使用最多的JavaEE企业应用开源框架。
Spring的整体架构
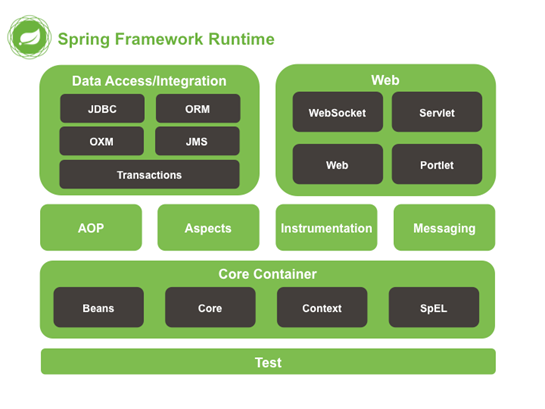
- 核心容器
核心容器(Core Container)由spring-core、spring-beans、spring-context、spring-context-support和spring-expression(Spring Expression Language)模块组成。- spring-core 和 spring-beans模块提供框架的基础部分,包括IoC和 Dependency Injection功能。BeanFactory是一个复杂工厂模式的实现,无须编程就能实现单例,并允许开发人员将配置和特定的依赖从实际程序逻辑中解耦。
- Context(spring-context)模块建立在Core和 Beans模块提供的功能基础之上,它是一种在框架类型下实现对象存储操作的手段,有一点像JNDI注册。 Context继承了 Beans模块的特性,并且增加了对国际化的支持(如用在资源包中)、事件广播、资源加载和创建上下文(如一个Servlet容器)。 Context模块也支持如EJB、JMX和基础远程访问的Java EE特性。 ApplicationContext接口是 Context模块的主要表现形式 spring-context-support模块提供了对常见第三方库的支持,以便集成到 Spring应用上下文,如缓存(EhCache、 JCache)、调度(CommonJ、 Quartz)等。
- spring-expression 模块提供了一种强大的表达式语言,用来在运行时查询和操作对象图。它是作为JSP2.1规范所指定的统一表达式语言的一种扩展。这种语言支持对属性值、属性参数、方法调用、数组内容存储、收集器和索引、逻辑和算数的操作及命名变量,并且通过名称从 Spring的控制反转容器中取回对象。表达式语言模块还支持列表投影、选择和通用列表聚合。
- AOP Instrumentation
spring-aop模块提供AOP(面向切面编程)的实现,从而能够实现方法拦截器和切入点完全分离代码。使用源码级别元数据的功能,也可以在代码中加入行为信息,在某种程度上类似于NET属性。
单独的 spring-aspects模块提供了集成使用 AspectJ。spring-instrument模块提供了类 instrumentation的支持和在某些应用程序服务器使用类加载器实现。 spring-instrument-tomcat用于 Tomcat Instrumentation代理。 - 消息
自 Spring Framework4版本开始提供 spring-messaging模块,主要包含从 Spring Integration项目
中抽象出来的,如 Message、MessageChannel、MessageHandler及其他用来提供基于消息的基础服务。
该模块还包括一组消息映射方法的注解,类似基于编程模型中的 Spring MVC的注解。 - 数据访问/集成
数据访问/集成(Data Access/ntegration)层由JDBC、ORM、OXM、MS和 Transaction模
块组成。- spring-jdbc 模块提供了一个JDBC抽象层,这样开发人员就能避免进行一些烦琐的JDBC编
码和解析数据库供应商特定的错误代码。 - spring-tx 模块支持用于实现特殊接口和所有pO类的编程及声明式事务管理。
- spring-orm 模块为流行的对象关系映射API提供集成层,包括JPA和 Hibernate使用 spring-orm模块,可以将这些O/R映射框架与 Spring提供的所有其他功能结合使用,如前面提到的简单的声明式事务管理功能。
- spring-oxm 模块提供了一个支持 ObjectXML映射实现的抽象层,如JAXB、 Castor、JiBX和 XStream
- spring-ms 模块包含用于生成和使用消息的功能。从 Spring Framework4.1开始,它提供了与 spring-messaging的集成。
- spring-jdbc 模块提供了一个JDBC抽象层,这样开发人员就能避免进行一些烦琐的JDBC编
- Web
Web层由spring-web、 spring-webmvc、 spring-websocket和spring-webflux组成- spring-web 模块提供了基本的面向Web开发的集成功能,如文件上传及用于初始化loC容器的 Servlet 监听和Web 开发应用上下文。它也包含HTTP客户端及Web相关的Spring远程访问的支持。
- spring-webmvc 模块(也称 Web Servlet模块)包含Spring的mvc功能和REST服务功能。
- spring-websocket 模块是基于 WebSocket协议通信的程序开发。
- spring-webflux 模块是 Spring5新添加的支持响应式编程的Web开发框架。
- 测试
spring-test模块支持通过组合 JUnit或 TestNG来实现单元测试和集成测试等功能。它不仅提供了 Spring ApplicationContexts的持续加载,并能缓存这些上下文,而且提供了可用于孤立测试代码的模拟对象(mock objects)。
Spring的优势
- 方便解耦,简化开发
通过 Spring提供的 IoC容器,可以将对象间的依赖关系交由Spring进行控制,避免硬编码所造成的过度程序耦合。用户也不必再为较为底层的需求编写代码,可以更专注于上层的应用。 - AOP 编程的支持
通过 Spring的 AOP 功能,方便进行面向切面的编程,许多不容易用传统OOP(Object Oriented Programming:面向对象编程) 实现的功能可以通过 AOP 轻松应付。 - 声明式事务的支持
可以将我们从单调烦闷的事务管理代码中解脱出来,通过声明式方式灵活的进行事务的管理,提高开发效率和质量。 - 方便程序的测试
可以用非容器依赖的编程方式进行几乎所有的测试工作,测试不再是昂贵的操作,而是随手可做的事情。 - 方便集成各种优秀框架
Spring可以降低各种框架的使用难度,提供了对各种优秀框架(Struts、Hibernate、Hessian、Quartz等)的直接支持。 - 降低 JavaEE API 的使用难度
Spring对 JavaEE API(如 JDBC、JavaMail、远程调用等)进行了薄薄的封装层,使这些API 的使用难度大为降低。 - Spring框架源码是经典学习范例
Spring的源代码设计精妙、结构清晰、匠心独用,处处体现着大师对Java设计模式灵活运用以及对 Java技术的高深造诣。它的源代码无疑是Java技术的最佳实践的范例。
简单的例子
- 创建一个名为spring的maven工程,然后在pom.xml文件中,新增Spring的基础依赖
1
2
3
4
5
6
7<dependencies>
<dependency>
<groupId>org.springframework</groupId>
<artifactId>spring-context</artifactId>
<version>5.2.9.RELEASE</version>
</dependency>
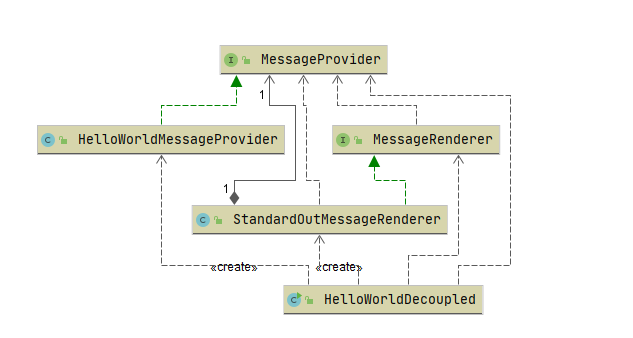
</dependencies> - 下面描述一个消息输出的例子,其中
MessageProvider负责消息获取或者提供,MessageRenderer负责消息渲染呈现,例如HTML格式输出或者文本直接输出。面向接口编程,解耦依赖,代码如下:1
2
3
4
5
6
7
8package org.example.spring.message;
/**
* 负责获取消息
*/
public interface MessageProvider {
String getMessage() ;
}消息获取和消息渲染接口类的实现分别是:1
2
3
4
5
6
7
8
9
10
11
12package org.example.spring.message;
/**
* 负责渲染消息
*/
public interface MessageRenderer {
void render();
void setMessageProvider(MessageProvider provider);
MessageProvider getMessageProvider();
}1
2
3
4
5
6
7
8
9
10package org.example.spring.message.impl;
import org.example.spring.message.MessageProvider;
public class HelloWorldMessageProvider implements MessageProvider {
public String getMessage() {
return "Hello World";
}
}然后,我们实现消息打印的代码如下:1
2
3
4
5
6
7
8
9
10
11
12
13
14
15
16
17
18
19
20
21
22
23
24
25
26
27
28package org.example.spring.message.impl;
import org.example.spring.message.MessageProvider;
import org.example.spring.message.MessageRenderer;
public class StandardOutMessageRenderer implements MessageRenderer {
private MessageProvider messageProvider;
public void render() {
if (messageProvider == null) {
throw new RuntimeException(
"You must set the property messageProvider class ."
+ StandardOutMessageRenderer.class.getName());
}
System.out.println(messageProvider.getMessage());
}
public void setMessageProvider(MessageProvider provider) {
this.messageProvider = provider;
}
public MessageProvider getMessageProvider() {
return this.messageProvider;
}
}则,总的程序类结构如下:1
2
3
4
5
6
7
8
9
10
11
12
13
14
15package org.example.spring.old;
import org.example.spring.message.MessageProvider;
import org.example.spring.message.MessageRenderer;
import org.example.spring.message.impl.HelloWorldMessageProvider;
import org.example.spring.message.impl.StandardOutMessageRenderer;
public class HelloWorldDecoupled {
public static void main (String... args) {
MessageRenderer mr =new StandardOutMessageRenderer();
MessageProvider mp= new HelloWorldMessageProvider();
mr.setMessageProvider(mp);
mr.render() ;
}
}
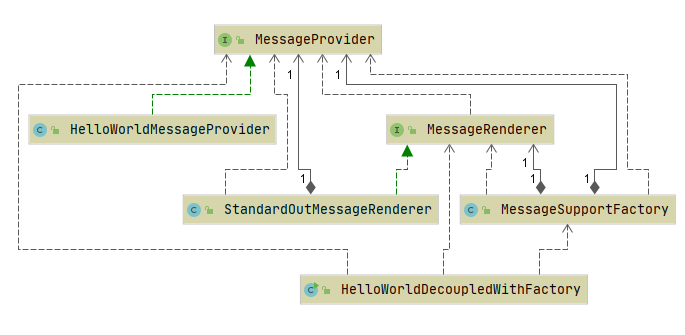
但是上面的代码还有一个问题,我们要更改MessageProvider和MessageRenderer的接口实现,就意味着要对代码进行更改。为了解决这个问题,可以建立一个简单的工厂类,从属性文件中读取实现类的名称,并代码应用程序对它们进行实例化,代码如下:配置文件1
2
3
4
5
6
7
8
9
10
11
12
13
14
15
16
17
18
19
20
21
22
23
24
25
26
27
28
29
30
31
32
33
34
35
36
37
38package org.example.spring.message;
import java.util.Properties;
public class MessageSupportFactory {
private static MessageSupportFactory instance;
private Properties props;
private MessageRenderer renderer;
private MessageProvider provider;
private MessageSupportFactory() {
props = new Properties();
try {
props.load(this.getClass().getResourceAsStream("/msf.properties"));
String rendererClass = props.getProperty("renderer.class");
String providerClass = props.getProperty("provider.class");
renderer = (MessageRenderer) Class.forName(rendererClass).newInstance();
provider = (MessageProvider) Class.forName(providerClass).newInstance();
} catch (Exception ex) {
ex.printStackTrace();
}
}
static {
instance = new MessageSupportFactory();
}
public static MessageSupportFactory getInstance() {
return instance;
}
public MessageRenderer getMessageRenderer() {
return renderer;
}
public MessageProvider getMessageProvider() {
return provider;
}
}msf.properties的内容如下:使用工厂类,来实现消息输出的Main实现则如下:1
2renderer.class=org.example.spring.message.impl.StandardOutMessageRenderer
provider.class=org.example.spring.message.impl.HelloWorldMessageProvider则,总的程序类结构如下:1
2
3
4
5
6
7
8
9
10
11
12
13
14package org.example.spring.old;
import org.example.spring.message.MessageProvider;
import org.example.spring.message.MessageRenderer;
import org.example.spring.message.MessageSupportFactory;
public class HelloWorldDecoupledWithFactory {
public static void main (String... args) {
MessageRenderer mr = MessageSupportFactory.getInstance().getMessageRenderer();
MessageProvider mp = MessageSupportFactory.getInstance().getMessageProvider();
mr.setMessageProvider(mp);
mr.render();
}
}
用Spring重构
上面的例子实际上,还存在两个问题:
- 必须编写大量的粘合代码将应用程序拼凑在一起,同时保存组件松耦合
- 仍然需要手动提供
MessageProvider实例的MessageRenderer实现。
为了解决粘合代码太多的问题,可以从应用程序中完全删除MessageSupportFactory类,并使用Spring接口ApplicationContext替换它。这个接口用于管理Spring所管理的有关应用程序的所有环境信息。同时,这个接口扩展了另一个接口ListableBeanFactory,而后者充当Spring管理的任何bean实例的提供程序。
- 使用XML文件配置(以前的主流配置方式,现在都是推荐注解方式配置,并且推荐使用Spring boot)
首先,以该种方式实现后的Main方法类如下:在这段代码片段中,我们可以看到main()方法获取了 ClassPathXmlApplicationContext 的实例(从项目的类路径中的文1
2
3
4
5
6
7
8
9
10
11
12
13package org.example.spring.xml;
import org.example.spring.message.MessageRenderer;
import org.springframework.context.ApplicationContext;
import org.springframework.context.support.ClassPathXmlApplicationContext;
public class HelloWorldSpringDI {
public static void main(String... args) {
ApplicationContext ctx = new ClassPathXmlApplicationContext("spring/app-context.xml") ;
MessageRenderer mr = ctx.getBean("renderer",MessageRenderer.class);
mr.render();
}
}
spring/app-context.xml 加载应用程序,配置信息), 类型为 ApplicationContext ,井通过使用 ApplicationContext.getBean()方法获得 MessageRenderer 实例。现在不必太担 getBean() 方法;只需要知道该方法读取应用配置(此时为一个 XML 件), 并初始化Spring 的 ApplicationContext 环境,然后返回配置好的 bean 实例。该 XML 文件(app-context.xml) 的作用与 MessageSupportFactory 所使用文件的作用相同。Spring会负责解析配置,实例化对象实例,并注入实例的依赖项,注册Bean,存储为指定的ID。1
2
3
4
5
6
7
8
9
10
11
12
<beans xmlns="http://www.springframework.org/schema/beans"
xmlns:xsi="http://www.w3.org/2001/XMLSchema-instance"
xmlns:p="http://www.springframework.org/schema/p"
xsi:schemaLocation="http://www.springframework.org/schema/beans
http://www.springframework.org/schema/beans/spring-beans.xsd">
<bean id="provider"
class="org.example.spring.message.impl.HelloWorldMessageProvider"/>
<bean id="renderer"
class="org.example.spring.message.impl.StandardOutMessageRenderer"
p:messageProvider-ref="provider"/>
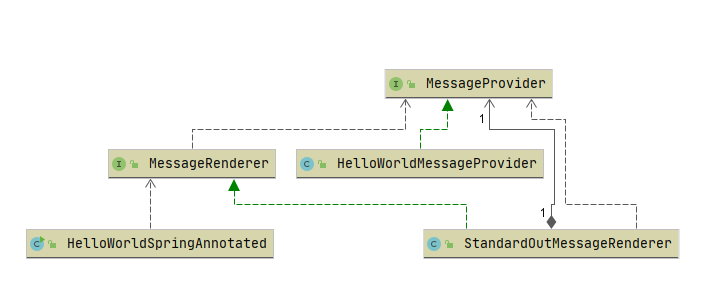
</beans> - 使用注解的Spring配置
从Spring 3.0 开始,开发 Spring 应用程序 不再需要 XML 配置文件 可以将它 替换为注解和配置类。配置类是 用@Configuration 注解的 Java 类,它 包含了 bean 定义(用 @Bean 注解的方法),或者通过使用@ComponentScanning 对bean 定义进行注解,从而识别应用程序中 bean 定义。下面所示的代码与前面提供的app-context.xml 文件等价:这个时候,必须修改 main()方法以将 ClassPathXmlApplicationContext 替换为另一个知道如何从配置类读取 bean 定义的 ApplicationContext 实现, 该类为 AnnotationConfigApplicationContext:1
2
3
4
5
6
7
8
9
10
11
12
13
14
15
16
17
18
19
20
21
22
23package org.example.spring.annotated;
import org.example.spring.message.MessageProvider;
import org.example.spring.message.MessageRenderer;
import org.example.spring.message.impl.HelloWorldMessageProvider;
import org.example.spring.message.impl.StandardOutMessageRenderer;
import org.springframework.context.annotation.Bean;
public class HelloWorldConfiguration {
// equivalent to <bean id=provider class=”..”/:>
public MessageProvider provider() {
return new HelloWorldMessageProvider();
}
// equivalent to <bean id="renderer” class=” . . ” />
public MessageRenderer renderer() {
MessageRenderer renderer = new StandardOutMessageRenderer();
renderer.setMessageProvider(provider());
return renderer;
}
}则,总的程序类结构如下:1
2
3
4
5
6
7
8
9
10
11
12
13
14package org.example.spring.annotated;
import org.example.spring.message.MessageRenderer;
import org.springframework.context.ApplicationContext;
import org.springframework.context.annotation.AnnotationConfigApplicationContext;
public class HelloWorldSpringAnnotated {
public static void main (String... args) {
ApplicationContext ctx = new AnnotationConfigApplicationContext
(HelloWorldConfiguration.class);
MessageRenderer mr = ctx.getBean("renderer",MessageRenderer.class);
mr.render();
}
}
上面的Spring实现,实际上已经是控制反转的基本原理体现,依赖注入是IoC的一种特殊形式。
3. 使用注解扫描包的形式初始化
1
2
3
4
5
6
7
8
9
10
11
12
13
14
15
16
17
18
19
20
21
22
23
24
25
26
27
28
29
30
31
32
33
34
35
36
37
38
39
40 package org.example.spring.annotated;
import org.example.spring.message.MessageRenderer;
import org.springframework.context.ApplicationContext;
import org.springframework.context.annotation.AnnotationConfigApplicationContext;
public class HelloWorldSpringAnnotatedScan {
public static void main (String... args) {
ApplicationContext ctx = new AnnotationConfigApplicationContext("org.example.spring.annotated");
MessageRenderer mr = ctx.getBean("renderer",MessageRenderer.class);
mr.render();
TestBean testBean = ctx.getBean(TestBean.class);
System.out.println(testBean.getMessage());
}
}
```
可以看到,这个初始化类,会扫描包`org.example.spring.annotated`下的注解,注册bean,例如`org.example.spring.annotated`包下新增的一个类:
```java
package org.example.spring.annotated;
import org.example.spring.message.MessageProvider;
import org.springframework.beans.factory.annotation.Autowired;
import org.springframework.stereotype.Component;
public class TestBean {
MessageProvider messageProvider;
private String name;
TestBean(){
this.name= "Test";
}
public String getMessage() {
return messageProvider.getMessage()+" "+this.name;
}
}
AnnotationConfigApplicationContext 容器创建过程
Spring在BeanFactory基础上提供了一些列具体容器的实现,其中AnnotationConfigApplicationContext是一个用来管理注解bean的容器,从AnnotationConfigApplicationContext的实现结构图中可以看出:

- AnnotationConfigApplicationContext继承GenericApplicationContext这个通用应用上下文,GenericApplicationContext内部定义了一个DefaultListableBeanFactory实例,GenericApplicationContext实现了BeanDefinitionRegistry接口,所以可以通过 AnnotationConfigApplicationContext实例注册bean defintion,然后调用refresh()方法来初始化上下文。
- AnnotationConfigApplicationContext继承AbstractApplicationContext,AbstractApplicationContext提供了ApplicationContext的抽象实现。
下面分析上面的例子的初始化过程:
1
ApplicationContext ctx = new AnnotationConfigApplicationContext(HelloWorldConfiguration.class);
AnnotationConfigApplicationContext的构造函数做了以下内容
1
2
3
4
5
6
7
8
9public AnnotationConfigApplicationContext(Class<?>... componentClasses) {
//1. 初始化bean读取器和扫描器;
//调用父类GenericApplicationContext无参构造函数,初始化一个BeanFactory: DefaultListableBeanFactory beanFactory = new DefaultListableBeanFactory()
this();
//2.注册bean配置类
register(annotatedClasses);
//3.刷新上下文
refresh();
}
- 父类GenericApplicationContext的无参构造函数
1
2
3
4
5
6
7
8
9
10
11
12
13
14
15
16
17
18
19public class GenericApplicationContext extends AbstractApplicationContext implements BeanDefinitionRegistry {
private final DefaultListableBeanFactory beanFactory;
private ResourceLoader resourceLoader;
//...
public GenericApplicationContext() {
//初始化一个BeanFactory,可以看DefaultListableBeanFactory保存bean定义BeanDefinition对象到Map beanDefinitionMap中,BeanDefinition包含了bean的属性以及bean的实例对象
//当 BeanDefinition 注册完毕以后, Spring Bean 工厂就可以随时根据需要进行实例化了。
//①:单例Bean:IOC启动时则实例化 ②:原型Bean:IOC启动时不实例化,真正使用时才实例化。
//懒加载:只针对单例Bean,意思是IOC容器启动时单例Bean可以不实例化,真正调用的时候才实例化(类似原型Bean的初始化顺序)。 主要经过方法链:reflesh() 、 finishBeanFactoryInitialization (factory) 、 DefaultListableBeanFactory.preInstantiateSingletons (), 在这里会根据注册的 BeanDefinition 信息依此调用 getBean(beanName) 。而真正实例化的逻辑和 BeanFactory 是“殊途同归”的,所有有关 Bean 实例化都可以从 getBean(beanName) 入手。
this.beanFactory = new DefaultListableBeanFactory();
}
//...
} - 自己无参构造函数this()初始化bean读取器和扫描器
1
2
3
4
5
6public AnnotationConfigApplicationContext() {
//在IOC容器中初始化一个 注解bean读取器AnnotatedBeanDefinitionReader,对带有注解的BeanDefinition进行注册
this.reader = new AnnotatedBeanDefinitionReader(this);
//在IOC容器中初始化一个 按类路径扫描注解bean的 扫描器,可以扫描到@Component @Repository @Service @Controller 的BeanDefinition注册到容器中。
this.scanner = new ClassPathBeanDefinitionScanner(this);
} - 对带有注解的BeanDefinition进行注册,例如上面的HelloWorldConfiguration register方法重点完成了bean配置类本身的解析和注册,处理过程可以分为以下几个步骤:
1
2
3
4
5
6
7
8
9
10
11
12
13
14
15
16
17
18
19
20
21
22
23
24
25
26
27
28
29
30
31
32
33
34
35
36
37
38
39
40
41
42
43
44
45
46
47
48
49
50
51
52
53
54
55
56
57
58
59
60
61
62
63//按指定bean配置类读取bean
public void register(Class<?>... annotatedClasses) {
for (Class<?> annotatedClass : annotatedClasses) {
registerBean(annotatedClass);
}
}
public void registerBean(Class<?> annotatedClass) {
doRegisterBean(annotatedClass, null, null, null);
}
//核心实现逻辑
<T> void doRegisterBean(Class<T> annotatedClass, Supplier<T> instanceSupplier, String name,
Class<? extends Annotation>[] qualifiers, BeanDefinitionCustomizer... definitionCustomizers) {
//将Bean配置类信息转成容器中AnnotatedGenericBeanDefinition数据结构, AnnotatedGenericBeanDefinition继承自BeanDefinition作用是定义一个bean的数据结构,下面的getMetadata可以获取到该bean上的注解信息
AnnotatedGenericBeanDefinition abd = new AnnotatedGenericBeanDefinition(annotatedClass);
//@Conditional装配条件判断是否需要跳过注册
if (this.conditionEvaluator.shouldSkip(abd.getMetadata())) {
return;
}
//@param instanceSupplier a callback for creating an instance of the bean
//设置回调
abd.setInstanceSupplier(instanceSupplier);
//解析bean作用域(单例或者原型),如果有@Scope注解,则解析@Scope,没有则默认为singleton
ScopeMetadata scopeMetadata = this.scopeMetadataResolver.resolveScopeMetadata(abd);
//作用域写回BeanDefinition数据结构, abd中缺损的情况下为空,将默认值singleton重新赋值到abd
abd.setScope(scopeMetadata.getScopeName());
//生成bean配置类beanName
String beanName = (name != null ? name : this.beanNameGenerator.generateBeanName(abd, this.registry));
//通用注解解析到abd结构中,主要是处理Lazy, primary DependsOn, Role ,Description这五个注解
AnnotationConfigUtils.processCommonDefinitionAnnotations(abd);
//@param qualifiers specific qualifier annotations to consider, if any, in addition to qualifiers at the bean class level
// @Qualifier特殊限定符处理,
if (qualifiers != null) {
for (Class<? extends Annotation> qualifier : qualifiers) {
if (Primary.class == qualifier) {
// 如果配置@Primary注解,则设置当前Bean为自动装配autowire时首选bean
abd.setPrimary(true);
}
else if (Lazy.class == qualifier) {
//设置当前bean为延迟加载
abd.setLazyInit(true);
}
else {
//其他注解,则添加到abd结构中
abd.addQualifier(new AutowireCandidateQualifier(qualifier));
}
}
}
//自定义bean注册,通常用在applicationContext创建后,手动向容器中一lambda表达式的方式注册bean,
//比如:applicationContext.registerBean(UserService.class, () -> new UserService());
for (BeanDefinitionCustomizer customizer : definitionCustomizers) {
//自定义bean添加到BeanDefinition
customizer.customize(abd);
}
//根据beanName和bean定义信息封装一个beanhold,heanhold其实就是一个 beanname和BeanDefinition的映射
BeanDefinitionHolder definitionHolder = new BeanDefinitionHolder(abd, beanName);
//创建代理对象
definitionHolder = AnnotationConfigUtils.applyScopedProxyMode(scopeMetadata, definitionHolder, this.registry);
// BeanDefinitionReaderUtils.registerBeanDefinition 内部通过DefaultListableBeanFactory.registerBeanDefinition(String beanName, BeanDefinition beanDefinition)按名称将bean定义信息注册到容器中,
// 实际上DefaultListableBeanFactory内部维护一个Map<String, BeanDefinition>类型变量beanDefinitionMap,用于保存注bean定义信息(beanname 和 beandefine映射)
BeanDefinitionReaderUtils.registerBeanDefinition(definitionHolder, this.registry);
}
- 根据bean配置类,使用BeanDefinition解析Bean的定义信息,主要是一些注解信息
- Bean作用域的处理,默认缺少@Scope注解,解析成单例
- 借助AnnotationConfigUtils工具类解析通用注解
- 将bean定义信息以beanname,beandifine键值对的形式注册到ioc容器中
refresh()刷新上下文
refresh方法在AbstractApplicationContext容器中实现,refresh()方法的作用加载或者刷新当前的配置信息,如果已经存在spring容器,则先销毁之前的容器,重新创建spring容器,载入bean定义,完成容器初始化工作,debug进源码可以看出AnnotationConfigApplicationContext容器是通过调用其父类AbstractApplicationContext的refresh()函数启动整个IoC容器完成对Bean定义的载入。
AbstractApplicationContext.java中refresh方法的实现代码如下:public void refresh() throws BeansException, IllegalStateException { synchronized (this.startupShutdownMonitor) { //1.刷新上下文前的预处理,例如初始化属性,环境变量,重置监听等 prepareRefresh(); //2.获取刷新后的内部Bean工厂 ConfigurableListableBeanFactory beanFactory = obtainFreshBeanFactory(); //3.BeanFactory的预准备工作,例如指定类加载器,配置beanFactory各工作组件 prepareBeanFactory(beanFactory); try { // BeanFactory准备工作完成后,可以做一些后置处理工作, // 4.空方法,用于在容器的子类中扩展 postProcessBeanFactory(beanFactory); // 5. 执行BeanFactoryPostProcessor的方法,BeanFactory的后置处理器,在BeanFactory标准初始化之后执行的, //在这里,把注解里里面的bean定义也都注册了 invokeBeanFactoryPostProcessors(beanFactory); // 6. 注册BeanPostProcessor(Bean的后置处理器),用于拦截bean创建过程 registerBeanPostProcessors(beanFactory); // 7. 初始化MessageSource组件(做国际化功能;消息绑定,消息解析) initMessageSource(); // 8. 初始化事件派发器 initApplicationEventMulticaster(); // 9.空方法,可以用于子类实现在容器刷新时自定义逻辑 onRefresh(); // 10. 注册时间监听器,将所有项目里面的ApplicationListener注册到容器中来 registerListeners(); // 11. 初始化所有剩下的单实例bean,单例bean在初始化容器时创建。原型bean在获取时(getbean)时创建,懒加载bean在获取时创建 finishBeanFactoryInitialization(beanFactory); // 12. 完成BeanFactory的初始化创建工作,IOC容器就创建完成; finishRefresh(); } catch (BeansException ex) { if (logger.isWarnEnabled()) { logger.warn("Exception encountered during context initialization - " + "cancelling refresh attempt: " + ex); } // Destroy already created singletons to avoid dangling resources. destroyBeans(); // Reset 'active' flag. cancelRefresh(ex); // Propagate exception to caller. throw ex; } finally { // Reset common introspection caches in Spring's core, since we // might not ever need metadata for singleton beans anymore... resetCommonCaches(); } } }
上面的bean实例化是根据注册的BeanDefinition,来进行bean实例化的。对于Bean的实例化,可以直接通过断点debug bean的构造方法来跟踪bean的实例化代码堆栈。
 微信
微信 支付宝
支付宝